A DOCTOR’S PERSPECTIVE
Digital Workflows That Connect—Predictably
Using Celtra Duo and Celtra Press for reliable, natural-looking restorations.
by Kevin Pawlowicz, DDS
8 August 2018
We live in a very exciting time for our profession. As a dentist, I’m able to save teeth never before thought salvageable and provide teeth to patients who never imagined that they could possibly have them again. With the use of Dentsply Sirona’s cone beam computed tomography (CBCT) and SICAT function application, dentists and technicians can make virtual skulls that talk, move, chew, and even sing.
Yet the more advanced technology becomes, I find it still comes down to the same basics. My mentor, and the finest dentist I’ve ever known, built his career on the philosophy of, “Use nothing but the best materials and the best labs because that’s what will make or break you.” Regardless of the case, I have come back to this conclusion time and time again and it always stands true.
One of the main reasons I own a CEREC system is that I never lose control of a case; it stays in-house from preparation to final prosthesis. But as we get busier and cases become more complex, a solid partner in the dental lab is an absolute must! The inLab system and its connectivity with CEREC doctors assure that we all speak the same language. By using inLab and Sirona Connect, we can work with a lab in California as if they were right next door.
Moreover, with the dawn of newer materials, clinicians are constantly trying to sort through the marketing claims of all these products and are also left with the confusion of where to use them due to them being more specific to placement. So we’re left to sort things out on our own… or are we? As my mentor said, it’s all about the materials and labs.

Fig. 1 Preoperative image.

Fig. 3 inLab wax mock-up.

Fig. 5 inLab case to be printed for articulator.

Fig. 2 Preoperative CEREC scan.

Fig. 4 Temporaries in mouth.
Celtra Press, the newest pressable material by Dentsply Sirona created exclusively for labs, brings all of the things we look for in order to provide our patients reliable, natural-looking restorations: strength, beauty, and adaptability to surrounding dentition. The following two cases are complimentary of our inLab partner, without whom we wouldn’t have been able to deliver such dependable, esthetically pleasing results to our patients.
The Celtra family of materials (Celtra Press and Celtra Duo) in combination with the inLab system and Sirona Connect make a completely digital work flow not only possible, but predictable.
Case Presentation:
A patient presented to the office with severe caries present following years of neglect. He recently came to the realization that his health and smile were a priority, and he wanted to begin and complete the restorative process as quickly as possible (Figure 1).
Treatment Plan:
In order to achieve his goals, the patient required a complete smile makeover. We decided to move forward with an all-digital solution with the help of our equipment and materials partner, Dentsply Sirona, and our laboratory partner, AA Dental Design, located in Murrieta, California. The plan was for us to create one side of restorations here in the office, and the other would be created by AA Dental Design.
As for materials, we used Celtra Duo for our chairside milling because of its high translucency and superior strength. More-over, it is truly bondable and works well with all types of restorations. We chose Celtra Press for the lab-side restorations also because of the additional strength it provides, as well as its beautiful flowability.

Fig. 6 Articulated models.

Fig. 8 Models in articulator. (2)

Fig. 10 Temporaries of articulated models in mouth. (2)

Fig. 12 Celtra Duo (posterior right side)

Fig. 7 Models in articulator. (1)

Fig. 9 Temporaries of articulated models in mouth. (1)

Fig. 11 Temporaries of articulated models in mouth. (3)

Fig. 13 Celtra Duo (posterior left side)
Case Details:
The patient first required an implant on tooth No. 19. Using my Omnicam intraoral scanner and CBCT scan, we created a CEREC 2 surgical guide and placed an Astra Tech implant. With this approach, the patient was able to simultaneously begin the healing process (of merely 6 weeks) while we created the rest of the case.
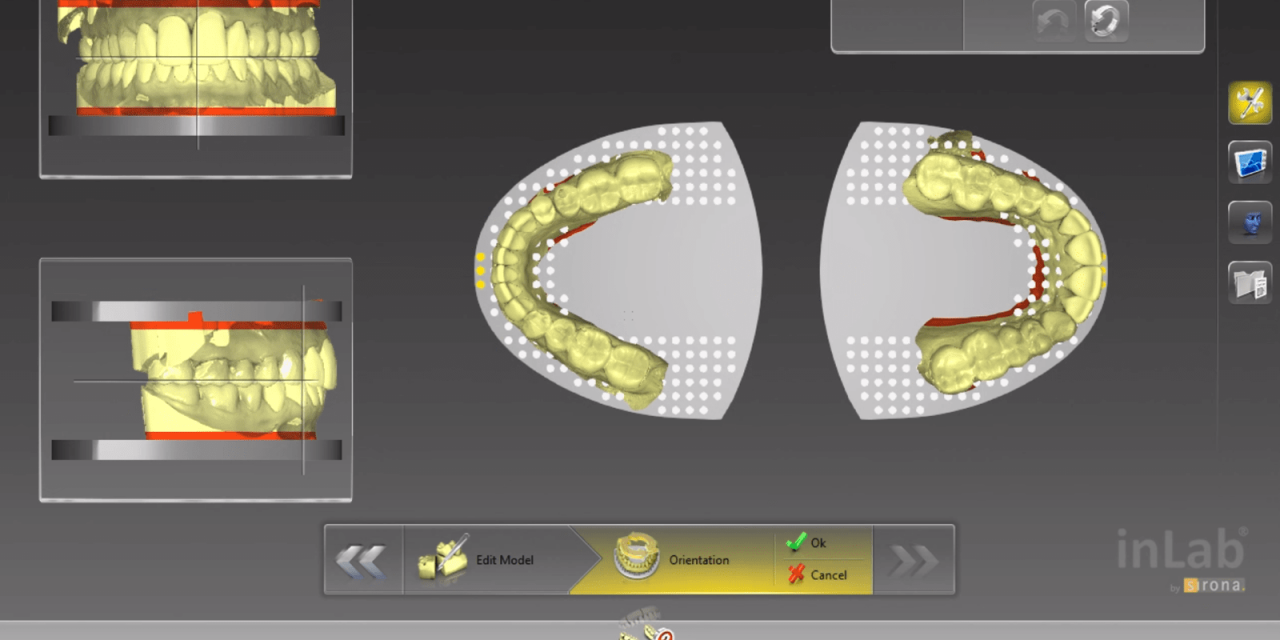
By using my Omnicam, we were able to do a full-arch scan to send over to the lab via Sirona Connect. Using the Omnicam in conjunction with the Sirona CBCT scan with the SICAT function also enabled us to create a virtual articulator. The lab was then able to create a virtual wax-up (Figure 2 through Figure 5).
The stereolithography (STL) designs for the case were then sent to us from the lab digitally the very next day, as opposed to weeks or months later. We then printed the models and made appropriate stents (Figure 6 through Figure 8). By using the stents, we were able to achieve an ideal bite in the provisionalization stage on the very first attempt (Figure 9 through Figure 11). There was perfect occlusal contact all the way to the posterior region, with only one high spot at the canine—an easy fix.
From that point on, the biocopy function in the software made finishing the case a breeze, providing perfect matches for the patient’s unique, individual tooth morphology.
Following the preparation of the teeth, we were able to connect again with our lab partner and have them design and press the restorations on the posterior left side by using the new Celtra Press. We then milled the posterior right side here in the office using CEREC and Celtra Duo.
These posteriors are a great example of both options, with one side milled right here in our office using CEREC and Celtra Duo, and the other side pressed by the lab using inLab and Celtra Press and then returned to us (Figure 12 and Figure 13).
Case 2
Case Presentation:
In this next case, the patient was in a car accident approximately 10 years ago and lost teeth Nos. 6 through 9. She has had a very frustrating experience getting her original smile back. Her case involved a tough implant placement, and even harder implant restorations (Figure 14 through Figure 16).
Treatment Plan:
The plan was to restore and place implant abutments on teeth Nos. 6, 7, and 9 using Celtra Press due to its superior strength and bond ability.

Fig. 14 Preoperative image

Fig. 16 Old implant abutments, preoperative. (2)

Fig. 18 Celtra Press.

Fig. 20 Metal abutments versus Celtra Press abutments. (1)

Fig. 22 Pink porcelain gingival shades. (1)

Fig. 24 Preoperative versus current. (1)

Fig. 15 Old implant abutments, preoperative. (1)

Fig. 17 Scan bodies in place.

Fig. 19 Celtra Press.

Fig. 21 Metal abutments versus Celtra Press abutments. (2)

Fig. 23 Pink porcelain gingival shades. (2)

Fig. 25 Preoperative versus current. (2)
Case Details:
Using the CEREC and Sirona Connect, we already had access to the case and were able to use either scan posts or ti-bases with scan bodies; we chose the latter (Figure 17). We virtually planned her case by scanning and then having the lab design the case using in-Lab software. We then sent the case to the lab using Sirona Connect so they could mill temporary abutments for teeth Nos.6, 7, and 9 out of polymethyl methacrylate (PMMA).
The Celtra family of materials in combination with the inLab system and Sirona Connect make a completely digital work flow not only possible, but predictable.
After confirmation from the patient, we converted the temporaries to abutments with Celtra Press, due to its high-strength qualities and bond ability. Using the same materials, we also were able to do the final prosthesis with Celtra Press, choosing the perfect shade from the Celtra Press shade guide, which offers a wide selection of pink porcelains (Figure 22 and Figure 23), to provide a more beautifully esthetic yet high-strength restoration (Figure 24 and Figure 25).


