CAD/CAM
Case Study: Conus® Abutments, a Fixed, Hygienic, Restorative Solution
Portrait® IPN
Denture Teeth
Lucitone 199®
Denture Base Resin
Triad®
Visible Light Cure System
Dentsply®
Implants
Aquasil®
Smart Wetting® Impression Material

“Restorative Dentistry has always been the art and science of restoring dental patients to their optimal masticatory function, aesthetics and overall health. Recent restorative innovations and dental implant advances have afforded, cases proven to previously be difficult, treatment options to achieve patient expectations and overall biomechanical oral health and success. Dental patients, often times, present at the dental office with failing dentition caused by an assortment of causalities; whether it be genetic, diminished or nonexistent dental care, trauma and/or medicinal induced failures. Dentists are tasked with providing a treatment protocol and solutions to restore the patient to a proper function.” Dr. Lars Bouma
Meeting the patient’s needs
This was the case with John, a 61 year old patient who visited his Dentist in Wichita, KS. John a happy normal man with all of his faculties was in a horrible automobile accident 15 years ago, which left him a paraplegic and wheelchair bound. The medications he was prescribed for his ailments had rendered him with severe dry mouth. The dry mouth caused his dentition to fail and had made him increasingly intolerant of his own teeth. Several options were presented, but John chose to have all of his teeth extracted and immediate dentures made. He was immediately unhappy and unable to wear his dentures. After suffering for a year from gagging with his dentures, his Dentist referred John to Dr. Lars Bouma, DDS of Implant and Prosthodontic Associates in Oklahoma City, OK. Along with the help of a friend, John drove 5.5 hours each direction to visit with Dr. Bouma and explore his options.
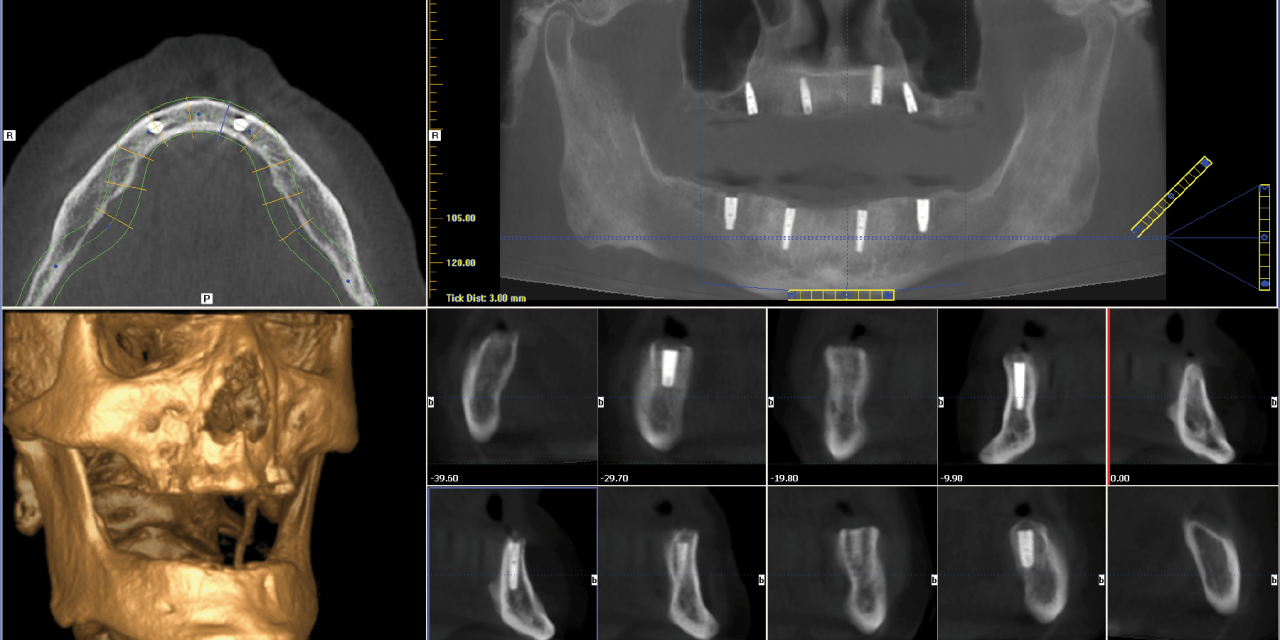
On the first consultation with Dr. Bouma, a comprehensive assessment and radiographs were completed
On the first consultation with Dr. Bouma, a comprehensive assessment and radiographs were completed. Since John had now not worn dentures for a couple of years, his mouth had changed from where it was originally. His tissues were dry and his tongue was hypertrophied. His treatment started with new dentures being made. They were fabricated using Portrait® IPN® teeth and Lucitone 199® denture acrylic from Dentsply Sirona. However, following the procedure and insertion of his new definitive dentures, John was still unable to tolerate them and wanted a more fixed restorative option. The treatment plan needed to be changed; fixed implant options were discussed with John, utilizing Zirconia screw retained or hybrid restorative bridges; nevertheless the extreme financial considerations made these options unviable. Dr. Bouma decided to present a “Fixed, Hygienic Solution” option to John, using four ANKYLOS® implants from Dentsply Sirona in each arch, in conjunction with the Conus® patient specific abutments and friction cap by ATLANTIS with his new dentures.
ATLANTIS VAD software, note the denture to friction fit cap relationship and non parallel implants in the maxilla compared to the parallel placement in the mandible.
This implant treatment protocol would allow the Conus® attachments to be embedded into the dentures and allow the dentures to actively engage the implants, providing a fixed feeling for the patient and providing the ability to remove the dentures to clean them, as well as the implants. Since John had the use of one hand, this was a great solution for him. Dr. Bouma chose this treatment protocol using Conus® abutments because he says, “Conus® allows us to choose one path of insertion irrespective to the angle of the implants in respect to each other, due to the fact that they are fabricated using Computer Aided Design-Manufacturing and specifically customized for the individual, differing from other attachment systems.” In John’s case, the maxilla’s implants were not parallel due to anatomic limitations and Conus® patient specific abutments were able to be reangulated allowing for correction of the implants alignment. Dr Bouma continued by saying, “lack of parallel paths of insertion between implants will wear components more quickly and cause them to ultimately fail. Conus® abutments and friction caps allow for a truly passive draw.”
The Restorative Process
The patient was prepared for surgery after all assessments were made to ensure appropriate placement of implants in the jaws. Due to the nature of the patient’s health, his bone anatomy was less than ideal in certain areas, particularly in the maxilla, and therefore Dr. Bouma had no choice but to place the implants in varying angular positions. A two stage implant placement technique was chosen, with the first stage consisting of placing the implants in the bone and the second stage, re-exposing the implants and placing healing abutments to allow the tissue to properly heal. This is accomplished within four to six months of Osseointegration and healing. Upon healing, an open tray Multi-viscosity impression was taken of the upper and lower arches using Aquasil® Ultra XLV Extra Low Viscosity (Orange), Aquasil® Ultra LV Low Viscosity (Aqua) and Aquasil® Ultra Monophase Viscosity (Purple) regular set from Dentsply Sirona, a Vinyl polysiloxane. The impressions were cast using type four (IV) gypsum improved stone. Laboratory implant analogs for the ANKYLOS® implant system were utilized to reproduce the implants’ rotation, position and depth in the model, and moulage were placed using Aquasil® Ultra XLV Extra Low Viscosity (Orange) fast set from Dentsply Sirona, to reproduce the soft tissue around the necks of the implants.
The completed implant models were then packaged and sent to Atlantis, along with a clear mock-up (a duplicate of the denture, which was an analog in this case to a waxed-up denture) of the patient’s expected final result.
These are both critical components; ATLANTIS will scan the models using FLOs (Fixture Level Orientation scan flags) in order to establish the exact placement and orientation of the implant and then scan the mock-up into the system. With that done, the digital designer at ATLANTIS can align the abutments to be parallel and exhibit the same grouped path of insertion. Once the digital design is completed and approved by the Dental Lab and/or Dentist, it is then sent to manufacturing to produce the patient specific Conus® abutments for optimal retention of the overdenture and sent back to the Dental Lab.
At the dental office, Dr. Bouma retrieved the abutments and tried them all in the mouth to make sure everything fit well. Once proper fit was determined, the Conus® caps with friction fit were placed over the abutments and the denture the patient had been wearing, was relined over the top of the Conus® components. A pick up impression was made again using the Aquasil® vinyl polysiloxane described earlier. The Friction fit caps were blocked out of any undercuts and ensuring for non-engagement, which could potentially cause the locking of components with the impression material. Subsequently, the dental laboratory poured a stone model from the pick-up impression, and the denture was relined with heat-cured Lucitone 199® by investing, flasking and ultimately heat packing of the acrylic. Once relined, Dr. Bouma used a sharpie to mark around the peripheral of the cap and removed approximately 1-2mm to allow for small space around the Conus® friction caps. Polymerization sleeves were placed in the mouth around the implants to ensure that acrylic didn’t seep into or around the implants, adhesive was painted on the acrylic and cap, chairside processing material was mixed and placed within the cap sites, and finally, everything was seated back in the mouth. Five minutes were allowed for proper setting and the process was repeated for the opposite arch; both were pulled out and any excess was trimmed.
Conus abutments prior to pick-up, note silicone polymerization sleeves and 5 degree friction fit caps.

Cameo and Intaglio view of final prosthetics, note flanges are cut back to reveal more of a bridge instead of a denture.
The Results
The patient was ecstatic with the outcome of his case! He stated that “this is like having my own teeth, I am able to eat and function like I did before the accident.”
He continued to share that he can’t stop telling all his friends how for the first time in years, he feels he has the complete freedom to function; “I can eat anything….” It took a little bit of time at the onset to get used to engaging the friction in the overdenture, but now, it takes no more than 15 seconds to get them in and out. Dr. Bouma adds that, “this Fixed, Hygienic solution is a very simple and easy restorative solution, which provides the patient with the ability to clean his teeth as a normal denture, but has the security of a fixed bridge.” With the mobility and financial challenges of the patient, this restorative solution was the ideal treatment solution that immediately affected his life tremendously.

