CERAMICS
The Chameleon Effect of Celtra Press
by Bill Atkission
Images Courtesy of Dr. Bill Claytor DDS
7 August 2018
Ihadn’t done press work in a dozen years so when I got a call from Dentsply Sirona asking me to press some units using the Celtra Press material for a lecture that Dr. Bill Claytor was holding I was surprised but eagerly accepted. I’ve been hearing a lot about this new material and wanted to try it. I have worked well with Dr. Claytor in the past and was excited to get started.
I quickly set up my old pressing unit and gathered all of the necessary equipment that I would need. Dr. Claytor sent over two cases consisting of three units, a pair of centrals and one bicuspid, to press and finish and provide some images for his lecture. After working with Celtra Press I quickly realized what all the fuss was about…
Celtra Press is a unique material that has an amazing chameleon effect. It provides exquisite in-vivo blending (an ability to acquire a color resembling that of the adjacent structure) and the perfect balance of translucency and natural opalescence. The natural-like opalescence greatly reduces the common “greying” effect often seen with other products. It is also an excellent match for the Vita shade guide.
It provides exquisite in-vivo blending (an ability to acquire a color resembling the adjacent structure) and the perfect balance of translucency and natural opalescence.
Moreover, Celtra Press offers simple yet fast processing within a familiar work flow, and a minimal reaction layer. It’s fast and easy to polish, and you can also stain and glaze it, if desired. What’s more, it possesses a strength that reaches 500 MPa up to a three unit anterior bridge.
Case Presentation:
Two cases were received from the doctor for restoration of a bicuspid and two central incisors (#8 and #9) for chipped dentin and discoloration. (Figs. 1& 2) Both cases received happened to be somewhat difficult in regards to shade matching.

Fig. 1 Pre-op of Bicuspid

Fig. 2 Pre-op of two central incisors.
Treatment Plan:
Both cases and all three teeth were to be monolithic restorations with no cutbacks.
Step by Step:
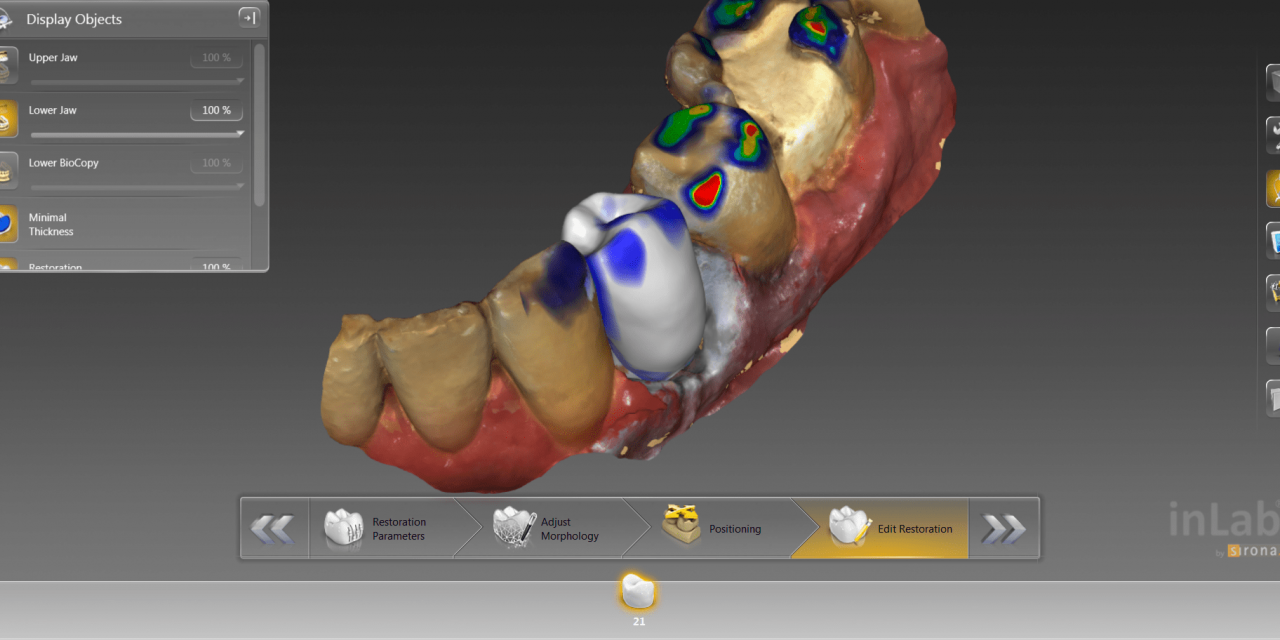
The bicuspid was to be done in an A3 shade (Vita) and the centrals in an A2 shade, both with external staining. Since both of these cases were sent through the Sirona Connect Portal and were to be done model-less, I used my inLab software to download and design all three units and then milled them out of a wax puck with my inLab MC X5. (Figs. 3-5)
I sprued them to the crucible, per the instructions in the manual, and invested them using the Celtra Press investment. This rapid heating investment has a low viscosity and precise expansion control resulting in smooth surfaces and very sharp margins. I mixed the investment with a 50/50 water to liquid ratio, pre-mixed it for 30 seconds, & then I placed it for 60 seconds under the vacuum. (Fig. 6)

Fig. 3 Designing central incisors in the “Edit Restoration” function of the inLab SW.

Fig. 5 Loading the wax puck for milling with the inLab MC X5.

Fig. 7 Restorations: Try in at day of delivery.

Fig. 9 Post-op of bicuspid.

Fig. 4 Designing bicuspid in the inLab SW.

Fig. 6 Shade matching central incisors.

Fig. 8 Shade matching central incisors.

Fig. 10 Post-op of central incisors.
After bench sitting for 20 minutes, I placed the 100g ring in my pre-heated burn out furnace at 850° C /1562° F for 45 minutes. Once the burn out was complete, I placed them in my Pro Press 100 using the recommended temperatures located in the instruction guide. I let the ring bench cool after pressing then proceeded to de-vest. De-vesting was very familiar; I used the same process as I did in my old pressing days. You may have your own procedure, or you may want to follow the instructions in the manual for best results.
When I sandblasted the ring I used aluminum oxide at 110 µm, max. 2.5 bar or 50 µm glass beads with 3 bars. I was then ready to cut off the restorations and finish. I recommend not using carbide burs or coarse grit stones, as this will cause a thermal crack on the ceramic coping/crown. The margins were sharp and pressed so easily with no flash or residue on the restorations so no acid was needed to get rid of a reaction layer.
I was now ready to finish my restorations. I used Dentsply Sirona die material while staining because it is specially designed to mimic the actual shade of the patient’s prepared tooth. When this material was placed inside the pressed Celtra crown, it truly provided accurate shade reproductions. If you are not layering, a 50-micron sized aluminum oxide at 20 psi pressure works well while lightly blasting the exterior surface of the crown. Just take caution as to not to harm the margins, and then steam clean.
I placed a small amount of the Dentsply Sirona Universal Stain and Glaze with the liquid to achieve a creamy viscosity and applied the mixture to the porcelain surface.
Dr. Claytor called after cementing both cases and raved about the look of the Celtra Press. He also shared the patients’ compliments about the restorations.
While using the Celtra Universal Stains, I was very impressed with the ease of use and the outcome of the restorations with my individual touch and characterizations.
The die material must be removed before firing, and I used Harvest Dental’s Super Peg II to hold the restorations to the pins/pegs of the sager tray. Do not totally fill the restoration with Super Peg II, rather use just enough to make it stable on the peg. If you are cutting back and layering your Celtra Press, remember to use a Power Fire program before layering the ceramic and refer to the firing programs in the instruction manual for optimal results. After etching, my restorations were now ready to deliver to the doctor.
I always like to receive feedback from doctors after cementation, whether good or bad. These cases were no exceptions. The patient with the two centrals had so many shades in his mouth that it was a difficult decision as to which shade to choose. (Figs. 7-8)
After discussions with the patient and knowing we were going to place other restorations in the anterior region, we decided to use an A2 with some shading using the Dentsply Sirona Universal Stain and Glaze kit to closely match his other restorations. The other case was equally difficult but was successfully completed using an A3 with a little stain and a glaze to see how well it matched; it truly had a chameleon effect. (Figs. 9-10)
Conclusion:
Dr. Claytor called after cementing both cases and raved about the look of the Celtra Press. He also shared the patients’ compliments about the restorations. After we talked about him sending additional cases for me to press with this system his exact words were, “Celtra Press may just be the perfect restorative material in dentistry! Its beautiful esthetics, superior strength, chameleon effect, and the ability to cement or bond make it extremely versatile. There is currently no other material like it that fulfills the esthetic needs of today’s dentist. Celtra Press is the future of esthetic restorations yet it is here today.” Thanks Dr. Claytor and Dentsply Sirona for opening my eyes to this wonderful pressing system!


